

This page explains, for those who live in Japan and earn revenue through Google AdSense, how to obtain and submit a "Certificate of Residence."
Unless you complete the proper procedure, taxes will be withheld at the source from your Google AdSense and YouTube earnings. This has nothing to do with Japanese taxes — left as is, you end up double-taxed by both the foreign side and Japan, which is a real loss.
To avoid this, Japan has signed "tax treaties" with various countries and regions, and once you submit a Certificate of Residence to Google, the foreign withholding tax can be reduced to 0%.
Only the foreign portion of taxes is affected. Japanese domestic taxes will be levied as usual.
You can eliminate the unnecessary withholding deducted overseas, so AdSense users should submit this as early as possible.
1: Fill out the "Application for Certificate of Residence"
The Certificate of Residence is a document that proves you live in Japan, and obtaining it is free of charge.
You can download the PDF from the National Tax Agency website.
https://www.nta.go.jp/taxes/shiraberu/taxanswer/osirase/9210.htm
Fill it out, print it, and submit it.
If there is a tax office near you, you can also visit the counter and ask for a Certificate of Residence ("Kyojusha Shomeisho ga hoshii desu") to receive a paper application form on the spot.
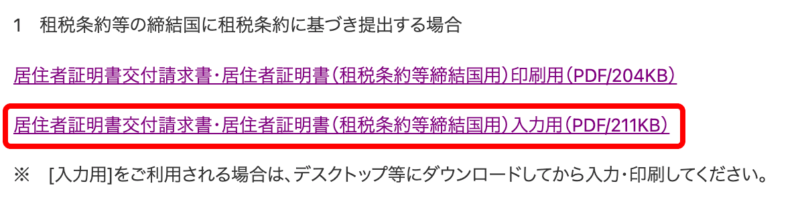
The download link is just below the heading "1 租税条約等の締結国に租税条約に基づき提出する場合" — look for "居住者証明書交付請求書・居住者証明書(租税条約等締結国用)〜".
There is a print version and an editable version. If you intend to fill it out by hand, choose the print version. With the editable version, you can fill in the fields using Adobe Acrobat or similar.
Sections you need to fill in
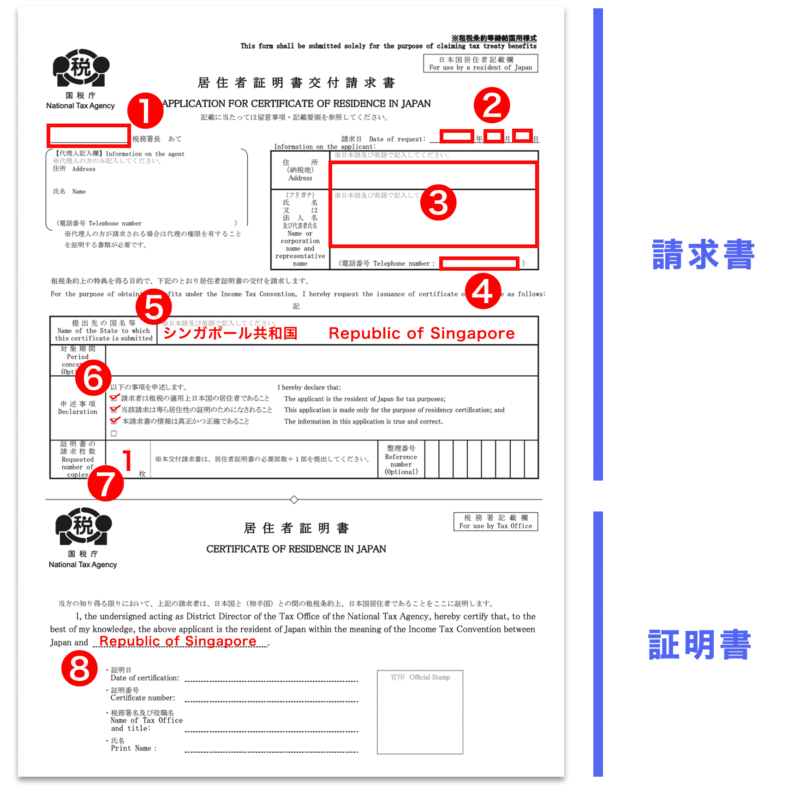
- The name of your local tax office* (see below for how to find it)
- The submission date
- Address (write it twice — Japanese in the upper line, English in the lower line**)
- Phone number (mobile is fine)
- For the destination country, write "シンガポール共和国 Republic of Singapore"
- Check all three of the top boxes
- Number of copies requested (one is usually fine)
- Write "Republic of Singapore"
* How to find your local tax office
On the National Tax Agency page below, enter your postal code and you can find the tax office that has jurisdiction over your area. The tax office shown there is your submission destination.
https://www.nta.go.jp/about/organization/access/chizu.htm
** How to write your address in English
When writing addresses in English, the order is reversed compared to Japanese. For example:
- Japanese: [Prefecture] + [City/Ward/Town] + [Block/Number] + [Building Name] + [Room Number]
- English: [Room Number] + [Building Name] + [Block/Number] + [City/Ward/Town] + [Prefecture]
Example:
Japanese: 〒100-0001 東京都 千代田区 千代田町 1丁目2番3号 マンション名 1234号室
English: 1234 MansionMei, 1-2-3 Chiyoda-cho, Chiyoda-ku, Tokyo 100-0001
You don't need to be that strict about it.
I personally found writing the building name in English long and tedious, so I just wrote the room number. I also put the postal code at the very front of both lines, and the application still went through without issue.
2: Submit the document to the tax office
You can submit the document either by mail or by bringing it directly to the counter.
If a tax office is nearby, walking it over to the counter saves you postage.
By mail
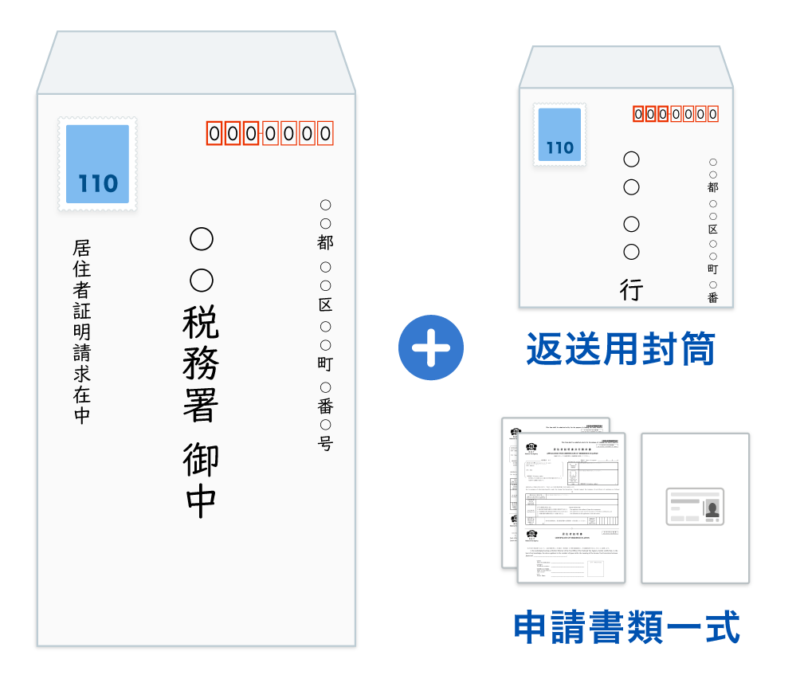
Enclose the application form, a copy of your ID, and a self-addressed, stamped return envelope, and mail everything to the "filing/mailing address" of your local tax office.
At the counter
Just hand it in at the reception.
Bring two copies of the application form along with a photo ID such as your My Number card, driver's license, or passport.
Once the document is ready, the tax office will contact you, and then you can pick it up. Note that you'll need your ID again when collecting the certificate.
3: Turn the paper certificate into a PDF (or JPG / PNG)
The certificate you receive from the tax office is on paper, so you'll need to scan it and save it as a digital file in PDF, JPG, or PNG format. If you don't own a scanner, the multi-function printers at convenience stores can scan documents as well.
4: Submit the certificate to Google
Once you have the digital version of the certificate ready, all that's left is to submit it.
If you see the message "Action required: Please verify your AdSense payment account," click the "Go to Payments" link.
If no message is shown, open the left-hand menu and go to "Payments" → "Payments info" → "Manage settings" → "Singapore tax info" → "Manage tax info."
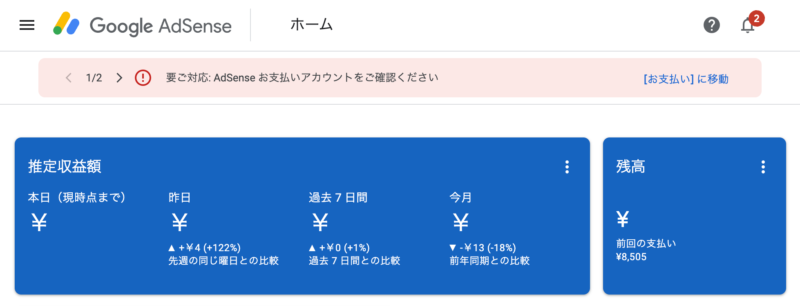
If the message "Additional documentation is required to verify your tax info. Until your tax info is approved, the default tax rate that applies based on your tax residency country will be applied." is shown, click "Update tax info."

On the "Update tax info" screen, upload the file.
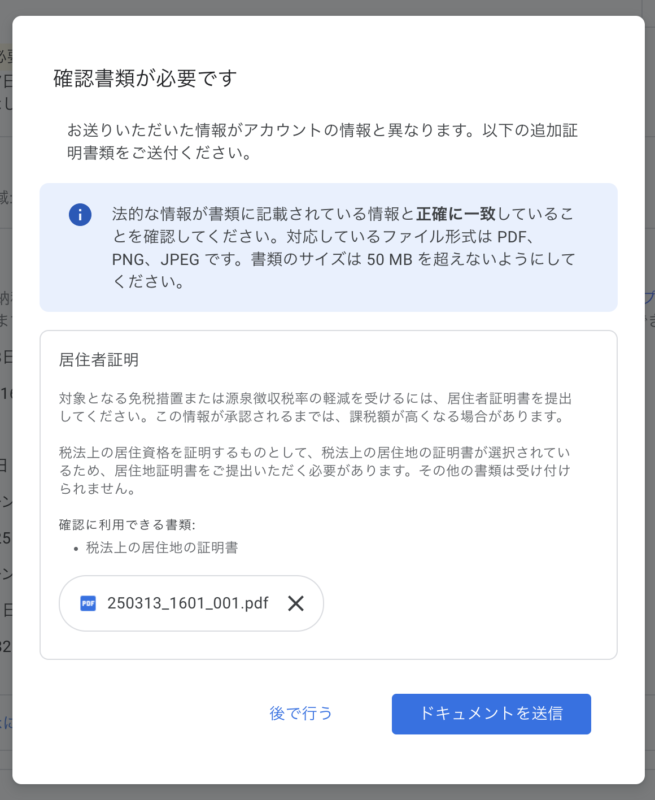
Press "Submit document" and you're done. Review takes anywhere from a few hours up to seven business days. In my case it was approved within a few hours.
FAQ
"The type of document you submitted is not one Google approves, or it may have expired" appears
Check that you didn't get the destination country wrong. The destination is not the United States — it's the Republic of Singapore.